Getting Started
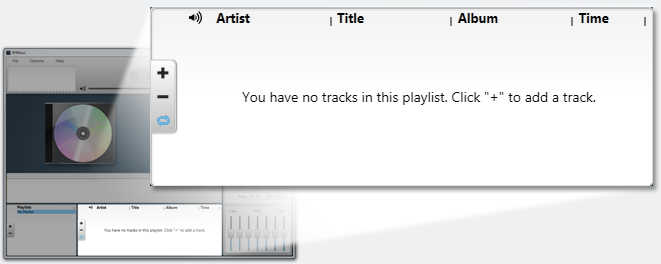
The first time you run BPMinus, you will have a Playlist automatically generated entitled "My Playlist." To start playing and controlling your music, you just need to click the "+" button to the right of your selected playlist. This will prompt you with a window asking you to browse for audio files.
After adding tracks to your playlist, you may begin playback. You'll note that the "Play" button has been enabled - allowing you to click play to start playback. You may also double-click on any of the tracks in your playlist to start playback on that particular track.
Once playback has started, you can start experimenting with the various track control options (tempo, pitch, equalization settings, etc.). See the section of the User Guide labeled "Interface Tour" for details on where to find these options and how they effect the sound.
Interface Tour
Tempo
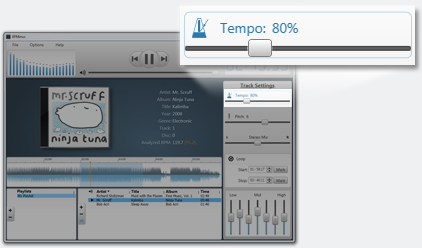
Chances are, if you're using BPMinus, you're using it to modify the tempo of your tracks. The tempo slider allows you to modify the tempo without changing the pitch of the playback (i.e., speed up your track without sounding like chipmunks - or slow down without sounding like Darth Vader). BPMinus allows tempo adjustments ranging from one-quarter of the original tempo (25%) to double the original tempo (200%).
BPMinus features a number of Advanced Options that will fine-tune sound quality and performance while playing back a track with a tempo adjustment. These can be accessed from the Options -> Advanced..." menu item. These options include the selection of three different time-stretching sound engines, each with their own set of configuration options. You can read more about these time-stretchers on the About page.
Pitch
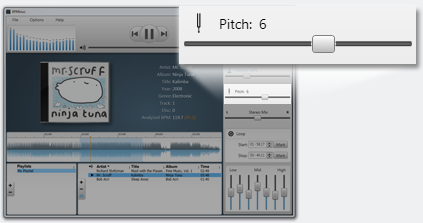
Using the same technology that allows us to alter the tempo without changing the pitch, we can also use make pitch corrections without altering the tempo. BPMinus has a pitch slider that allows drastic alteration of pitch as well as minor adjustment. This can be useful in correcting audio that is out of key or to assist with hearing a track in a more comfortable key.
Pitch adjustments are made in semitones. Each octave contains 12 semitones. Thus, sliding the pitch scale to a value of "12" would make the track be played back at one octave higher than the original recording. Likewise, a pitch value of "-12" would be one octave lower than the original recording. When changing the key of playback, tracks sound most natural when pitch adjustments are made in half-octave increments (i.e., even divisions of 6).
Stereo Mix
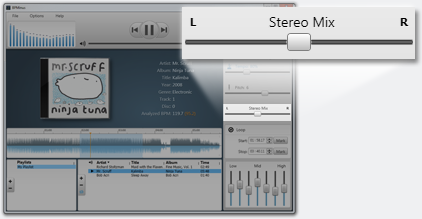
BPMinus allows you to isolate a single channel in a stereo file. This is often very useful in isolating the sound you want to hear. For instance, it is often the case that a particular guitar track or drum sound is only played out the left or right channel. As such, we give you a sliding scale to emphasize a particular side.
Sliding the stereo mix scale all the way to the left or right does not cut off sound from one ear or the other. Take, for example, a scenario where the Stereo Mix option has been slid entirely to the left. In this scenario, sound will still come out in both speakers, but it will all be the left channel of audio, none of the right.
Looping
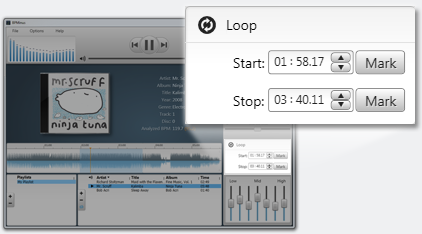
BPMinus has the ability to repeatedly loop on a selected region of your audio track. The simplest way to do this is to use your mouse and drag a selection region over the audio's waveform. However, for fine control over the loop selection, BPMinus provides fields for manual entry of the loop's start and stop points. Values can be entered in fractions of up to one one-hundredth of a second.
Another useful way to select a loop region is by listening to the audio track and setting the start and stop points by clicking the "Mark" buttons available on each field.
Equalizer
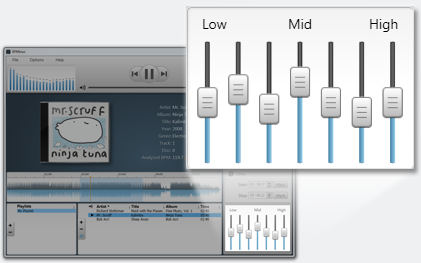
A seven-band equalizer is provided by BPMinus. The equalizer is capable of emphasizing (or de-emphasizing) particular frequencies of sound in your audio track. This can be extremely useful in isolating the sound of a guitar, vocals, a particular drum, etc.
On the "Low" end of the equalizer, you can usually emphasize instruments like the bass guitar or kick drum. The "Mid" range will have the vocals, guitar, and the snare drum. The "High" equalizer slider will generally control the emphasis on the cymbals. Of course, this can vary greatly depending on your audio track. Experiment!
Waveform Timeline
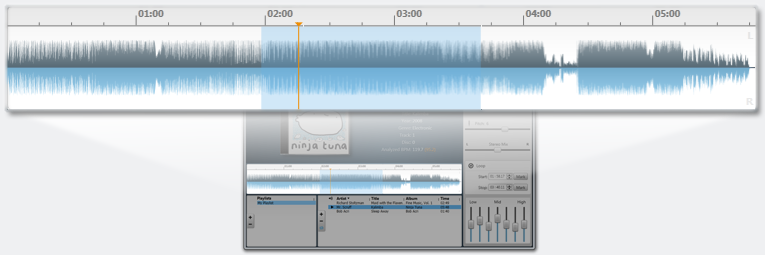
The waveform timeline allows you to see and set the current track's position. Clicking anywhere on the waveform will set the audio track to that position. It also displays and edits the loop bounds. The highlighted region of the waveform is the looping section, and this can be altered by clicking and dragging on the waveform.
Stereo waveform data is displayed on the timeline. The left audio information will be displayed on the top, and the right audio information is displayed on the bottom. This can be useful for visually identifying portions of a particular track (e.g., when a song gets quiet during the bridge). Time stamps are displayed at the top of the waveform.
Managing Playlists
Creating Playlists
BPMinus allows you to create multiple playlists. For music students and teachers, this allows you to easily categorize the various tracks that you'll be reviewing. To create a new playlist, click the "+" icon on tche far left of the window (under the list titled "Playlists"). This will create a new playlist with a default name and prompt you to enter a new name for the playlist.
Adding Tracks To Playlists
Tracks can be added to the playlist by click the "+" in the current playlist's grid (immediately to the right of the grid that shows your playlist). An "Open File" dialog will be presented. You'll be able to browse your computer for one or more files (hold shift or ctrl while selecting a file to select multiple files).
Sorting Playlists
Tracks on your playlist may be sorted by the contents of any of the columns that are displayed (artist, title, duration, etc.). To do so, simply click on one of the column headings and the playlist will be sorted by the contents of that column in either ascending or descending order. To reverse this order, simply click again. You can also sort by more than one category by holding down the shift key while clicking. For instance, if you wanted to sort first by artist then by title, you would click the "Artist" column header, press and hold shift, and then click on the "Title" column header.
Options
Options can be accessed from the menu at the top of the main window of BPMinus.
Preferences
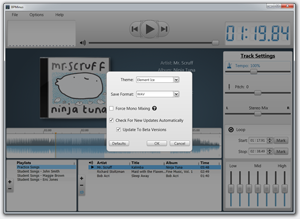
The preferences window allows you to specify basic customization options. These include:
- Theme - The color scheme and style of the application.
- Save Format - What file format BPMinus will save audio with. Some options may require plugins.
- Force Mono Mixing - Forces all speakers to have identical output.
- Check For New Updates - Whether BPMinus will contact BPMinus servers and check for new versions of the software.
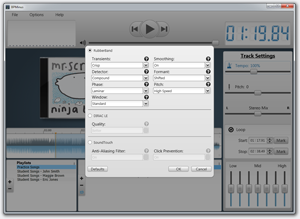
Advanced
The Advanced options specify how the core technologies behind BPMinus will sound during playback or when saving. These options often control the balance between performance and quality. For more information about what each option does, hover your mouse over the question mark next to the option name.
The Advanced window also allows you to choose between the three time-stretchers that are included with BPMinus. Each of these have their own strengths and weaknesses. For more information about the time-stretchers, see the About section of the BPMinus website.
Keyboard Shortcuts
| Action | Primary Shortcut | Secondary Shortcut |
|---|---|---|
| Play/Pause | Spacebar | Media Play/Pause Key |
| Play | Media Play Key | |
| Stop | S | Media Stop Key |
| Next Track | N | Media Next Key |
| Previous Track | P | Media Previous Key |
| Restart Loop | R | |
| Reset Track Settings | Escape | |
| Skip Forward - 5 Seconds | Right | |
| Skip Back - 5 Seconds | Left | |
| Skip Forward - 1 Second | Ctrl + Right | |
| Skip Back - 1 Second | Ctrl + Left | |
| Skip Forward - 30 Seconds | Shift + Right | |
| Skip Back - 30 Seconds | Shift + Left | |
| Increase Tempo | Plus (+) | |
| Decrease Tempo | Minus (-) | |
| Increase Pitch | Ctrl + Plus | |
| Decrease Pitch | Ctrl + Minus |